REWIRING
YOUR IGNITION COIL REWIRING
YOUR IGNITION COIL
Written by Cory B.
Well I got a lil creative
a few weeks ago. I went ahead and tested the positive
terminal of the coil with ignition on and found it to
be 11.7 Volts constant. The ECU grounds the coil to fire
it and to adjust timing, it grounds at different times.
So what I did is very
similar to the fuel pump hotwiring mod. I took a 30a
relay, some 12g wire, a fuse, and a couple crimps and
hotwired the positive terminal of the coil. I ran a 12g
lead from my 4g battery cable to the relay. I then ran
12g from the relay to the positive side of the coil.
Next, I used the stock coil wire to switch the relay
on and off and just grounded to chassis.
I immediately noticed
a smoother drive, smoother boost transition, and smoother
WOT pull. Starting is much snappier now. I just figured
I would share this with you all. I have been running
it for prolly three weeks now. Ran at the track once
and I have been running the hell out of the car too.
It works. I also had slight misfiring in boost after
switching to colder plugs that disappeared after wiring
the coil. So, take this for what you will. Enjoy.
What
you will need:
- At
least four feet of 12gauge wire depending on where
you get 12v from.
- A
relay. 30amp seems to work well
- A
fuse. This varies on the size of the wire you use.
For 12g, use a 20 or 30amp.
- A
Crimp for use with your coil positive.
Okay, on the relay.
Get a standard 30a relay and:
pin 30 -
Common. This is where you will run 12g from the battery
too.
pin 87 - This is where you will run
12g wire from the relay to the positive terminal on the
coil.
pin 86 - Either trigger or ground. Trigger is the
stock coil positive wire.
pin 85 - Either trigger or ground. Trigger is the
stock coil positive wire.
On pin 85 and 86, polarity
does not matter.
Note: I cannot stress
enough the importance of a good electrical connection.
Therefore, SOLDER ALL CONNECTIONS! I even went as far
as to solder the wire directly to the relay pin.
So.....
- Disconnect
battery positive and negative.
- Find
a good source to get a sold 12v from. Remember the
reason you are doing this mod and don't get it from
a light or something.
- Make
sure the connection is solid. I would advise not using
a crimper. If you do, solder it on.
- Now run the wire wherever
you like to the coil. Keep it clear of the exhuast,
turbo, and fan. All of which will eat your wire. Connect
this wire to terminal 30 on your relay. Put the fuse
somewhere on this wire.
- Cut the positive wire running
to your coil and solder it to terminal 86 or 85. Either
will work
- Solder 12g wire to terminal
85 or 86 depending on which you used for trigger, use
the free terminal. And run this wire to ground.
- Now run a piece of 12g
wire from terminal 87 to the coil positive terminal.
You will prolly end up using a crimp connector, but
solder it on.
- Re-connect positive and
negative battery cables.
- See how it runs.
To take full advantage
of this mod, replace your stock coil with a higher power
coil. I use a MSD Blaster SS coil.
Here are some pics:
The red wire coming from between my PSR is my 12v common.
Click on picture
to enlarge.

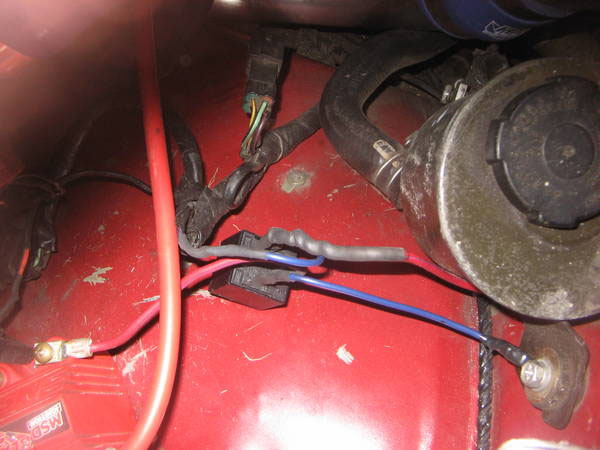
This shows how each terminal
is set up and shows where my stock positive coil wire
goes. Note it isn't the same color as yours. I had done
so much splicing on it that I ended up having to solder
a new piece on.
Click on picture
to enlarge.

This is to show you where
I am getting my 12v source from. You can see the red
wire runs behind the engine and between the power steering
pump resovoir to the relay.
Click on picture
to enlarge.

[ Go Back ] |